
Routines
The Kansa Wand and Face Oil Ritual: How to Do It
Learn the exact kansa wand technique with vitamin C face oil — slip, pressure, direction, and timing for a routine that actually works.
Disclosure — This article may contain affiliate links. We earn a small commission at no extra cost to you when you purchase through our links. This supports our ability to create independent, evidence-based skincare content.
My first kansa wand sat in a drawer for four months before I actually used it right. I’d bought it after a facialist used one on me and I practically floated out of the treatment room, but at home? I was just dragging a warm metal spoon around my face with no oil underneath, wondering why it felt like sandpaper instead of silk. Turns out the tool was never the problem. My technique was.
Once I paired it with an actual face oil and slowed down, the whole thing clicked. This isn’t a review of the wand itself — if you want the full breakdown of how a kansa wand differs from gua sha, we’ve covered that here. This is the how-to: the exact ritual, step by step, using a vitamin C face oil as the slip layer, so you get the de-puffing and glow without the redness or the “why does this feel awful” experience I had for way too long.
What the Wand Actually Does (and Doesn’t)
Quick reality check before we get into steps, because I don’t want you expecting miracles.
A kansa wand is a small, dome-shaped tool made from an alloy of copper and tin — kansa, in Ayurvedic tradition. It’s used with gentle, repetitive strokes to move a facial oil across the skin. What it can do: temporarily reduce puffiness by encouraging lymphatic drainage, warm and soften the skin so oil absorbs better, and give you two minutes of genuinely calming ritual in a day that’s otherwise chaos. What it cannot do: dissolve fat, contour your jawline permanently, or replace retinol. If an ad shows a before-and-after with a visibly different bone structure, that’s contouring makeup or a filter, not a metal spoon. We go deeper on the long-term claims in our piece on whether gua sha actually works, and most of that evidence applies here too.
The honest version: this is a five-minute-a-day habit that makes your skin look brighter and less tired right now. Treat it like that and you’ll never be disappointed.
Why Vitamin C Oil Is the Right Slip Layer
You cannot do this ritual dry. Full stop. Dragging metal across bare skin creates friction, and friction on your face is how you end up with irritation, not glow. You need oil, and not just any oil — you want something with enough slip to glide but not so much that the wand skids around uncontrollably.
This is where a vitamin C face oil earns its spot on your shelf. A traditional water-based vitamin C serum soaks in fast and leaves nothing for the wand to work with — you’ll be reapplying every thirty seconds. An oil-based formula stays on the surface longer, giving the tool something to actually massage into, while still delivering the brightening and antioxidant benefit you’d get from a serum.
We use the Kerala Botanics Ayurvedic Vitamin C Face Oil for this specifically because it does double duty. It’s formulated with an advanced, oil-soluble vitamin C that’s more stable than the standard L-ascorbic acid you’d find in a serum (we broke down the chemistry in our oil-soluble vs. water-soluble vitamin C guide), plus bakuchiol, which gives you a retinol-adjacent boost without the peeling. For a massage ritual, the texture matters as much as the ingredients — this one sits on skin just long enough for a full wand routine without pilling or turning tacky.
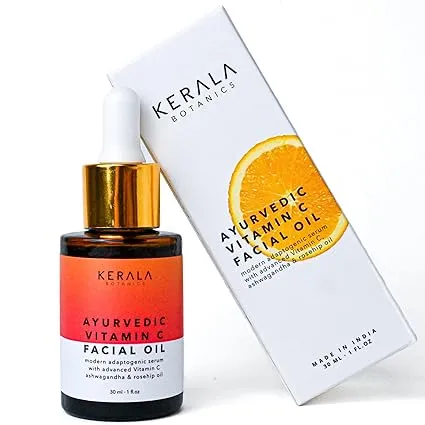
Ayurvedic Vitamin C Face Oil
Kerala Botanics
$49
★★★★☆
Con, because I promised you honesty: if you have very oily or acne-prone skin, a face oil at all — let alone one you’re massaging in for five minutes — might feel like too much. If that’s you, a lighter oil like grape seed under the wand and a separate vitamin C serum for your actual treatment step is a smarter split.
The Step-by-Step Ritual
Here’s the routine I actually do, most nights, minus the ones where I fall asleep on the couch mid-episode. Adjust the time investment based on your day, but don’t skip steps.
Step 1: Cleanse and Warm the Wand
Start on clean, slightly damp skin — it helps the oil spread evenly instead of sitting in patches. Run the kansa wand under warm water for a few seconds first. Cold metal on your face at 10pm is a genuinely bad time; warming it makes the whole ritual feel like a spa treatment instead of a chore.
Step 2: Apply the Oil — More Than You Think
Use 4 to 6 drops, which is more than you’d use for a regular moisturizing step. Warm it between your palms first, then press it into your face and neck. You want a visible sheen. If your skin looks matte within thirty seconds, add more oil before you pick up the wand.
Kansa Wand Facial Massage Tool
Fig + Yarrow
$68
★★★★½
Step 3: Start at the Neck, Work Upward
Direction matters here and it’s the opposite of what people assume. You’re not scrubbing your face like you’re exfoliating in the shower. You’re moving the tool in small circles or upward-outward strokes, always going up and out, mimicking the direction of lymphatic drainage.
Start at the base of your neck and work up toward your jaw. Then move to your jawline, sweeping toward your ears. Cheeks come next — from the sides of your nose, out toward your temples. Forehead strokes go from the center outward and up toward your hairline. Under-eyes get the lightest strokes of the entire routine, moving from the inner corner out toward the temple, never dragging downward.
Step 4: Pressure Should Be Light, Not Firm
This trips people up constantly. You are not trying to “sculpt” your face into submission. Pressure should feel like you’re smoothing wet paint, not kneading dough. If you’re leaving temporary red marks that last more than a minute or two, you’re pressing too hard. Light, repetitive strokes are what actually stimulate lymphatic flow — heavy pressure just irritates skin and can cause broken capillaries over time, especially if you have thin or reactive skin.
Step 5: Spend Real Time on Problem Areas
If puffiness is your main concern, linger at the jawline and under the chin — this is where fluid tends to pool overnight. If it’s a tired, dull complexion you’re after, focus more time on the cheeks and forehead, where the extra circulation shows up as a genuine glow, not just a flush that fades in ten minutes.
Step 6: Finish with Lymphatic Sweeps Down the Neck
End the ritual by sweeping the wand down the sides of your neck toward your collarbone. This part actually clears the fluid you just moved, rather than leaving it to pool at your jaw. Skip this step and you might notice puffiness just relocates instead of draining.
Total time: five to seven minutes. Do this nightly if you love the ritual aspect, or two to three times a week if you’re realistic about your evening energy levels — the skin benefit doesn’t disappear if you miss a day.
Morning vs. Night: Does It Matter?
Morning use is great if under-eye puffiness or a “did I sleep at all” look is your main issue — the cold-wand version (skip the warming step, run it under cool water instead) is genuinely one of the more satisfying five minutes of a morning routine. Night use is better if you want the oil to sit and work while you sleep, since vitamin C oils and bakuchiol both benefit from uninterrupted contact time. If you’re only doing this once a day, night wins for the actual skincare benefit. Morning wins for the “I look less exhausted before my 9am meeting” benefit. Neither is wrong.
Common Mistakes That Ruin the Ritual
The three I see (and made myself) most often: using too little oil, which turns a massage into friction; going too fast, which defeats the entire purpose since the benefit comes from slow, repetitive strokes, not speed; and skipping the neck sweeps at the end, which leaves you wondering why your face still looks puffy an hour later. Also — clean your wand after every use with a gentle cleanser or antibacterial wipe. It’s touching your face daily; treat it like a tool, not a decoration.
If you want the fuller context on why oils pair so well with Ayurvedic massage techniques generally, our guide to abhyanga adapted for the face is worth a read, and if you’re building a whole routine around one multitasking oil instead of five separate products, the 3-in-1 minimalist oil routine breaks down how that works day to day.
Putting It All Together
The ritual works when you respect two things: enough oil for real slip, and light, upward, outward pressure that gives your lymphatic system something to actually respond to. Skip either one and you’re just moving metal around your face for no reason.
Start with three sessions a week. Use a vitamin C oil with enough body to last the full massage, keep your strokes slow and light, and always finish with the neck sweep — that’s the step that actually clears what you just moved. Give it two weeks before you judge results. The puffiness reduction is immediate, but the skin-texture payoff from consistent vitamin C and bakuchiol exposure takes a little longer to show up. Worth the wait. Not even close.